Search This Blog

Custom Search

Mar 18, 2012

Do You Need To Replace Electrolyte in Your Car Battery?

Q: Just recently I had to replace my car battery. Some weeks before, my battery bracket loosened and the battery shifted, knocking off one of the caps, which I didn't know until I needed a jump. I put regular tap water inside and replaced the cap. Tap water was all I had at the time. After that the battery continued to weaken until it needed to be replaced. Could I had put any of the following substances in the battery to extend its life? Gatorade (powder or liquid), salt, saltwater, baking soda, sea water, or distilled water.

A: Anything on your list would have damaged your battery instantly. Battery electrolyte is sulfuric acid and water, and a certain amount of the lead electrolyte in solution. How much Lead? Depends on the state of charge of the battery, so the possibility of mixing up a concoction to replicate the spilled electrolyte accurately is not easy.

The best replacement for spilled electrolyte is the other cells in the same battery. Get a battery tester or a clean large syringe, and equalize the level of electrolyte between the 6 cells. If this leaves all of them too low, which it will, you can now add an identical amount of fresh electrolyte purchased from the auto parts store to bring them up to the correct level.

Low electrolyte levels caused by normal electrolysis in the battery should be topped off with nothing else except distilled or demineralized water.

Mar 17, 2012

My Reverse Lights Come on When I Hit the Brakes

Q: Every couple of months when I hit the breaks in my 1995 Toyota Camry, the reverse lights come on. They will do this for about a week and a half and then go back to only coming on when in reverse. What is causing this and how do I fix it?

A: There’s a bad ground somewhere near the tail lights, causing the brake lights to source their ground through the backup lights. Check ground point Ba1, which is in the trunk.

Mar 16, 2012

Can I Save Money and Repaint My Car's Clearcoat Only?

Q: My 2004 Mitsubishi Endeavor has started losing it's clearcoat in patches. Is there any way I can repair it without getting a new paint job?

A: No. All the clear coat is going to have to be sanded off, because it’s not bonding properly to the paint underneath it. In theory, you could then respray just the clear coat. In reality, the pigment layer will be sanded through to the primer in a lot of places. So, the color coat will have to be resprayed as well.

Mar 15, 2012

Which Tires Hydroplane More Easily?

Q: Do low profile tires tend to hydroplane more than regular tires?

A: Hydroplaning is a function of tire footprint, all other things being equal, a tire with a wider footprint will tend to hydroplane more. If the low-profile tire is wider, it will indeed hydroplane more easily. If the tire is low-profile, but has the same tread width, no.

Mar 14, 2012

Synthetic vs. Conventional Motor Oil

Q: How do you tell the difference between synthetic oil and conventional motor oil? A not so honest service station in my area was found adding regular motor oil, yet charged people for the more expensive synthetic oil. Please let me know if there is a simple way of telling the difference. I am quite sure the reading public would like to know this also.

A: The short answer is there’s no way to tell without sending a sample out for a chemical analysis.
My only suggestion is to watch the technician as he adds product.

Mar 13, 2012

How To Refill Nitrogen-Filled Tires

Q: I just purchased a car with nitrogen-filled tires. I know they aren't supposed to leak like air-filled tires can but leaks DO happen. So what do you do if a slight pressure drop happens? How much air can be put in without losing the nitrogen benefit? I would hate to have to go to a tire dealer and wait for a tech to put some in. Do you know of a company that markets aerosol cans of nitrogen similiar to "Fix A Flat"?

A: Most places that fill tires with N2 will top them off for free. I like the aerosol can idea, though. No one is doing that that I’m aware of.


Mar 12, 2012

How To Remove Tree Sap From Car Hood

Q: I'm forced to park my car under a tree. In the early spring tree sap drops on my roof and hood. Commercial products claiming to remove these stains don't even come close to working. Cleaner waxes are simply a waste of time and effort. Any ideas?

A: Aside from moving the car? Try a car cover? If Bug & Tar remover doesn’t cut it, you’re not going to find anything more aggressive that won’t damage the paint.

Mar 11, 2012

Why Does Water Collect Inside My Car's Headlights?

Q: My headlights are always collecting water inside. The dealer says he can replace them, but they’re very expensive, and he wouldn’t guarantee that the new headlights wouldn’t collect water also. I took out the headlamp assemblies and coated all of the seams between the clear lens and the back with bathtub caulk, and gooped up the rubber dingus that goes over the headlight wires with a lot more caulk, but it didn’t help a bit.

A: Let’s examine why there is water inside the lamp assemblies in the first place. As the outside temperature goes down and your nice warm headlamps cool off (either from being in the sun or just from being turned on), cooler, moister outside air trickles into the housings. The housings are vented top and bottom to allow for pressure differences, or they would quickly crack and fail. When the clear plastic lens is even a little bit cooler than the air inside the housing, droplets of moisture will condense on the inside of the lens. That’s normal. When the outside temperatures come back up in the morning, the moisture will evaporate.

Some vehicles don’t vent as well as others. Some drivers keep their cars parked in shady, damp areas or in cool, damp underground parking structures. And the moisture collects not as tiny droplets of mist but as what looks more like raindrops, and can even run down the glass and pool inside the housing.

Check to see if there’s a Technical Service Bulletin for your make and model of vehicle. If so, there may be a retrofit housing or an upgrade to the venting system. If not, you’re on your own. The first thing to try, if all you have is droplets, is to leave your headlights on while driving for a couple of hours, forcing the moisture off. If you have a spoonful or more splashing around, you may need to remove the housing and dry it out. Pour off the excess water, then add a few ounces of rubbing alcohol to the housing, sloshing it around and pouring it out. Repeat. Let the housing dry for a couple of hours in the sun or inside a nice warm house, preferably in some air that’s moving. Check that any vents aren’t plugged with spider eggs or mud. Install the housing and try to park facing south.

Mar 10, 2012

My Car's Battery Goes Dead

Q: Our 1999 Ford Taurus, which resides under a cover, almost always has a dead battery after it sits for a month. I have had to replace it three times in the past seven years. I tried one of those solar panels plugged into the cigarette lighter by having a clear plastic window installed in the cover. The plastic housing on the charger actually melted when the heat outside got to 118 F and shorted, further draining the battery. Who knows what the temperature got to inside the car? Sure, I can disconnect and reconnect the battery, but for what that takes I can jump-start it with a portable jump-start battery device easier. Any advice to keep the battery from dying? The car’s parked in a lot across the street from the house, so running an extension cord to a trickle charger isn’t an option.

A: Melted the solar charger? Man, I bet you could bake cookies in there on a sunny day.

Letting any battery discharge that deeply will damage it immediately, which explains your high failure rate. And the heat will make the battery self-discharge even faster than normal.

My best suggestion: Get a battery disconnect switch, wired into the ground cable. This won’t prevent normal self-discharging, but it will eliminate any parasitic drains (like the radio presets and computer memory) that are killing the battery between uses. Then whenever you need the car, all you have to do is open the hood, turn the switch on, and start it up and drive away with clean hands. A decent battery should have enough juice left after a month to light the fires. In case the idle period is a little longer, keep an auxiliary starter box in the house on a charger. You can probably get enough charge into the nearly dead battery by plugging one of these gadgets into the cigarette lighter, also leaving you with clean hands.

A second suggestion would be to hard-mount the solar charger on the front license-plate bracket and leave it uncovered by your car cover. Park the car pointing southwest toward the afternoon sun to catch the most rays.


Would The Prius Get Better Gas Mileage If It Weighed Less? Part 2

Q: I read your answer concerning "Would The Prius Get Better Gas Mileage If It Weighed Less?". It was very interesting and I agree with your discussion but I'd like you to go a step further. The thing that is confusing about hybrids has to do with their efficiency. It seems to me that using an internal combustion engine to charge the batteries which power the electric motors that move the car would be less efficient that moving the same car with the internal combustion engine. I recall someone's theory having to do with "Conservation of Energy". Applying the same technologies that maximizes the efficiency of the gas engine as a "charger" could also make it a better "mover". Right?

A: You are correct, charging the batteries onboard with an IC engine and then powering the wheels with an electric motor is inherently less efficient than just gearing the IC engine to the wheels. That’s why most hybrids have some way of doing either or both.

Two compelling reasons to use batteries:

In a conventional hybrid, the batteries are on board to capture energy during regenerative braking, using this energy (normally wasted as heat in the brakes) to accelerate the car later.

In a plug-in hybrid, the batteries are recharged by the grid. A PHEV, if driven for short enough distances to not drain the batteries, may never consume gasoline.


Mar 9, 2012

Would The Prius Get Better Gas Mileage If It Weighed Less? Part1

Q: I have an idea for a story in your magazine. I was thinking you guys could buy a Prius and pull the batteries and anything at all related to the hybrid portion of the car. Obviously this adds up to a lot of weight—dead weight on the interstate where many people do most of their driving. No doubt this car would then get much better highway mileage. If they built it that way, it would be much cheaper and have a much smaller “carbon footprint” due to much less energy being used to build it. As the car is now, it often has to recharge the battery pack on the highway, hurting its real mileage, not to mention the burden of all that dead weight.

A: Your logic is faulty. Here’s why:

1. Overall weight has virtually no effect on steady-state cruising economy. Fuel consumption at expressway speeds on level ground is determined largely by aerodynamic drag and other parasitic drags such as the tire’s rolling resistance.

2. The onboard battery pack is charged, for the most part, when the vehicle slows down, capturing the energy that otherwise would be dissipated as heat in the brakes. It normally doesn’t get charged during steady-state driving or acceleration. (One exception: On some hybrids, notably Toyotas, the battery will be charged to load the engine when the engine is otherwise running to warm up or provide cabin heat. This avoids wasting the fuel needed to keep the engine running when the car isn’t moving. Clever.)

3. Aerodynamic drag goes up with the square of speed, but the power needed to overcome drag goes up with the cube of speed. It takes eight times as much power—or fuel—to go a constant 60 mph as it does to go 30 mph.

That’s why the Prius, the Insight and other hybrids can actually achieve better miles per gallon during moderatespeed urban stop-and-go driving than on long, high-speed freeway trips.


How To Fix a Car Paint Scratch

New Car + Parking Lot = Scratches and Chips

It's a fact of life. Other ­people often don't treat your car's paint with much consideration. Ditto for kids and pets, not to mention the odd troll with an attitude and a set of car keys. Respraying a car can cost thousands of dollars, while respraying a single panel may leave you with a clown car that doesn't match color left to right.

Fortunately, many small nicks, scratches and imperfections can be easily retouched. A careful job is unobtrusive and may well be almost totally invisible.

Proper conditions: Be comfortable

Before you break out your touchup tools, figure out what you're dealing with. If the scratch appears thin and white, it probably hasn't penetrated through the clear coat.

If it is body-colored or shows metal, you've got a deeper problem. Regardless, never try to touch up paint unless the temperature in your work area is shirt-sleeve- comfortable for you. The paint won't adhere, dry properly or gloss up. The ideal temperature would be in the 70s F, but 60 to 85 is acceptable. You'll need to be out of the wind and sun. Indoors is best, but a shady carport should do. The relative humidity should be less than 60 percent or so: The evaporating solvent will cool off the panel as it dries, potentially lowering the metal's temperature below the dew point and letting moisture ­condense on the surface. This is not ­conducive to good surface finish.

Mar 8, 2012

How To Unclog An Outboard Motor

Q: Six years ago I purchased a new 25 hp 4-stroke carbureted Mercury outboard motor. The carb is now suffering the effects of ethanol—a clogged fuel port stalls the engine at mid-throttle. I understand there are additives that will prevent or minimize this in the future, but is there anything on the market that will clean the carb out without having to dismantle it?

A: The only one I know of that claims to use enzymes to dissolve the organics left behind by ethanol is Starbrite’s Startron.

I’ve tried some in a generator that was left to bake for two years without fuel stabilizer. Just adding Startron wouldn’t get it started, but disassembling the carb showed why—the main jet was totally plugged, and had to be reamed out.

Because your outboard is still running, the additive might make is way in and dissolve the gunk.

On the other hand, I’m reluctant to tell you to do this and then have you stranded miles off shore when the carb plugs up completely. Got a second outboard motor on board?


How Your Headlights Work

Headlights have come long way since the crude lamps that lit the way for the first cars. Modern headlights use deceptively interesting tech to produce your car's beams, and the next generation—based on lightweight, energy-efficient LEDs—are on the way.

I'm willing to bet that drivers only think about headlights during one of two events: when for some reason they can't see at night, or when an oncoming car blinds them. Like the alternator, these critical pieces are overlooked—until they don't work. And that's a shame, because for the gearhead, there's a lot of interesting tech behind the glass. Like, for example, did you know that an HID headlight is like a lightning bolt in that a glowing arc of electricity illuminates the fixture? Plus, automakers are calling on headlights to increase not only safety but also fuel efficiency.

Knowing how your lights work will better prepare you to keep them maintained, so you're more likely to see that deer before it runs into your path. Besides, the rapid evolution of headlight tech is interesting in itself. Here's a primer.

The Old-Fashioned Way


The first cars used crude lamps fueled by either kerosene or (gasp) acetylene. About 100 years ago, the open flames were replaced with a small electric bulb housed between a polished reflector and a lens. These lights weren't sealed well, so the reflector corroded quickly, making the already insufficient lights even dimmer—and worse, they provided plenty of glare to oncoming traffic. These types of lights were made illegal in 1941, a scant year after the introduction of the sealed beam.

Sealed Beams


A sealed-beam headlamp is nothing different from a giant household bulb, a tungsten filament housed in a glass enclosure that's sealed and filled with inert gases. The reflector is inside the glass envelope. Like household bulbs, these gradually lose brightness as the tungsten evaporates from the filament and deposits on the reflector. Dippable high-and-low beams didn't come along until the '20s. Brightness and beam control in this era were inconsistent because of poor manufacturing tolerances. And the inside of the poorly sealed glass lens easily corroded, further reducing the brightness. Sealed-beam lights were cheap partly because they came in only three sizes—5- and 7-inch round and one square size—but more important, the standardized sizes limited styling differences among cars. Automakers started replacing sealed-beam lights with quartz-iodine technology in 1973.

Quartz-Iodine


Sylvania Silverstar H13 1. Quartz Glass 2. Support Strut 3. High Beam 4. Low Beam

QI is the predominant automotive lighting technology today. Legal in the U.S. since 1984, it uses a small bulb that resides inside a reflector/lens assembly. Thanks to modern sealing materials and techniques, the reflector is far less likely to corrode from moisture intrusion. The high-temperature quartz glass envelope allows the filament to remain at a much higher temperature, for a light that's closer to natural daylight. The higher temperature means a lot more light for the power consumed, but also makes the tungsten filament evaporate and redeposit on the glass, gradually reducing light output. To combat this, halogen bulbs are filled with iodine or bromine rather than the customary inert gas. The halogen combines with the tungsten vapor coating the cooler glass, then disassociates when it touches the hot filament, basically redepositing the evaporated tungsten back where it started.

Manufacturing these cylindrical bulbs is very high-tech. After the filaments are sealed to the glass at the bottom, most of the air is evacuated from the top. While a propane flame heats the neck in the top of the bulb to a semiliquid state, a jet of liquid nitrogen cools the base to minus 321 degrees F. Then a pellet of frozen gases is dropped in. Instantly, the hot, soft glass at the top is crimped, sealing the envelope. When the temperatures equalize and the gaseous pellet boils, the pressure inside rises to 4 to 5 atmospheres. The H13 high–low beam lamp shown in the lead photo is the industry's latest version. Computer vision systems carefully tweak the position of the filaments in each bulb as it's assembled, maintaining tolerances within 0.004 inch—which means replacing a lamp shouldn't require reaiming the headlamp. The high-beam filament sits at the precise focal point of the reflector, providing the best illumination up the road. The low-beam fila­ment sits slightly off the focal point to spread the beam and establish a cutoff pattern to keep glare out of oncoming drivers' eyes. Some quartz-lamp systems rely on the use of a metal shield to provide the cutoff pattern.

The color of bulbs is expressed as a function of the temperature of the light emitted. A QI bulb is around 3400 degrees K, as compared to natural sunlight, which is considered to be around 6000 K. Recently, we've started to see QI lights that have a blue-white color, not the usual warm yellow light. These are aftermarket bulbs with different filaments and glass coatings that attempt to emulate the blue hue of expensive high-intensity-discharge (HID) lights (I'll get to HID lights in a minute). While these bulbs do raise the color temperature, they don't get close to an HID's 5000-plus K color. Oh, and they don't necessarily raise the light output either. So what's the point? Style­—it's one way to spend $20 and acquire the cachet of $2000 HID lamps.

Mar 7, 2012

How to Break in a New Car

It’s a thing of beauty: A brand-new car, shiny and crisp. It makes you want to spend the whole evening walking around it. Pretty soon, the neighbors wander over to congratulate you—and to render advice.

Break it in carefully, one says: “No more than 30 miles per hour until it has 1000 miles on the odo.”

“No,” another says. “Drive it like you stole it, if you want it to be fast.”

Others recommend synthetic oil, or nitrogen in the tires, or a mouse-milk oil additive, guaranteed to double fuel economy.

The ritual of breaking in a new car is part of the body of knowledge we refer to as conventional wisdom. It’s not necessarily wise, and the technology of building a modern automobile has evolved to the point where a lot of “wisdom” is obsolete. Few cars specify a break-in procedure anymore, simply cautioning you to avoid extreme acceleration or extended idling for the first thousand miles or so, and there’s little in the way of extra service up front. Some don’t even mandate an oil change until 6000 miles. We think your new ride deserves better. Here are a few tips.


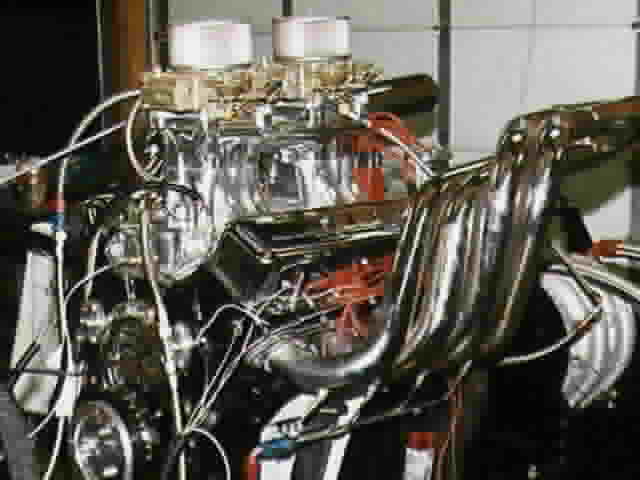
Engine Cylinder Walls

Piston rings don’t rely on their spring tension to seal against the cylinder bores. Instead, combustion gases work their way between the rings and the piston and force the rings outward. During the first few minutes of engine operation, it’s important that the throttle be opened pretty far at lower rpms to provide this high pressure. Otherwise, the rings won’t burnish the cylinder walls properly, and the engine will have high volumes of blow-by—which means excessive oil consumption and shortened engine life. If you’ve ever seen the car jockeys who drive new cars off the end of the production line into the storage lot, or the transporter drivers zipping up and down the car-hauler ramps, you’ll realize that this all-important step has been performed for you many times. If you’re installing a new engine, simply give it a few seconds of wide-open throttle in a high gear. For the first thousand miles, avoid constant speeds and throttle settings. If you commute in normal stop-and-go traffic, you’ll be fine. I advise against cruise-controlled sojourns across Nebraska.

Bearings

The admonition to keep engine revs low for an extended break-in period stems from the days when bearing and crankshaft manufacturing tolerances were far less rigorous and lubricating oil wasn’t nearly as good. While modern engines are assembled to much the same design clearances, the tolerances are much tighter, meaning the variability is smaller, greatly reducing the possibility of a tight spot. Redlining a fresh motor is generally a bad idea, but there’s no reason you shouldn’t drive normally. I would, however, avoid top-speed testing, drag racing or towing heavy trailers for the first 1000 miles.

Oil

I customarily change the oil in a new engine after about 20 miles, and again at 1000 or so. That 20-mile oil, you would think, would look pretty much like fresh oil right out of the bottle. Wrong. It usually looks more like metal-flake paint, iridescent with tiny particles of metal worn off rubbing surfaces inside the new engines. After a few hours of operation, this completely normal phenomenon slows down as the rings, camshaft, lifters and bearings burnish their respective mating surfaces.

Transmission

The engine break-in procedure also covers the gearbox and the clutch on manual-transmission cars. Most cars with automatic transmissions today are factory-filled with ATF and, supposedly, will never need changing. Some manufacturers are so confident of this that they don’t even have a dipstick or a fill hole. If the specified fluid is a more ­normal mineral oil, I’d change it and clean the pan after a thousand miles or so. The organic linings on the clutch packs shed a lot of debris, and it generally just turns into sludge that lies in the pan. You don’t want wear metals and sludge to get picked up by the pump and start circulating in the expensive bits.


(Photograph by Frederik Broden)

Brakes

New brake pads on new brake rotors don’t really require a break-in procedure. The texture deliberately left on the surface of the iron discs will grind down the fresh surface of the pad material within a few miles. Even so, refrain from high-speed stops or dragging the brakes for a few hundred miles. Racing pads, however, need to be heated up enough to fade and then carefully cooled off, which removes the top layer and provides better fade resistance.

Interior

Avoid the impulse to slather the interior trim with shiny protectants, which can leach the plasticizers out of new vinyl and increase the likelihood of age-related cracks. On the other hand, a generous dousing of Scotchgard on the cloth upholstery and carpets will keep dirt, pollen and mildew from clinging.

Paint

In years past, it was considered a good idea to not wax a fresh paint job for 90 days, to allow the paint to fully cure and any solvents to escape without being trapped under the wax. Modern catalyzed clear-coat paint is as hard as it will ever be as soon as it cures, before the car ever leaves the plant. Applying 3M Paint Protection Film to the leading edge of the painted bodywork will go a long way toward minimizing stone-chip damage. Otherwise, a good coat of wax will repel water, atmospheric pollutants and dead bugs.

NOW YOU KNOW: Is synthetic oil too slippery for proper break-in?

Conventional wisdom says that a new engine should be broken in on conventional mineral oil, regardless of your intentions to use a synthetic for the long haul. The conventionally wise say that synthetic oil is too slippery and won’t let the microscopic high points properly lap themselves in, delaying the break-in process. I say rubbish. Many modern cars, notably such high-performance marques as Porsche, Ferrari and Corvette, are factory-​filled with synthetics. You can bet that somebody has determined that the break-in process will proceed normally with synthetic in the sump of these ultra-high-performance engines. And that goes for your Toyota or Jeep as well.

Nonetheless, I do prefer to use a mineral oil for break-in. It’s $3 a quart versus $7, so I don’t mind changing it after 20 miles and again at 1000.

I would not, however, change the factory-fill synthetic back to mineral for break-in. Those vehicles typically have carefully assembled engines with instructions to do the first oil change at the regular interval, which could be up to 10,000 miles. In those cases, I simply change the oil early, before 1000 miles, just to be safe.

Synthetic oil is a superior product, particularly if your engine operates at the extreme ends of the temperature scale: high-temperature climates, towing or racing. But like any oil, synthetic will become contaminated with atmospheric dirt, wear particles, carbon, partially burned fuel, water and acid. Eventually, even if the oil itself is performing properly, all this extra junk will manifest itself as engine wear.

Also, the first oil change invariably reveals small particles of gasket sealer, chunks of unidentified plastic, the occasional metal flakes that weren’t cleaned off before assembly and even the odd washer or nut. It’s pretty scary. Better this junk come out sooner rather than later.

What You Need To Know About Grease

Q: I shot a bunch of expensive marine-style grease into the bearing buddies on my bass-boat trailer last fall. It was recommended to me by a marine mechanic as the best product for my trailer, because the wheels get dunked regularly, and this particular type of grease is supposed to be more water-resistant. I finally got a chance to go fishing last weekend and noticed that the grease cups had all leaked oily snot all over my brakes. So instead, I spent the afternoon cleaning and repacking all six wheel bearings and replacing all of the greasy, oily brake shoes. Can you suggest a brand of grease that won’t do this?

A: You mentioned the brand of grease in your letter, which I removed, because it's a perfectly good product, and the correct one for your application. Specifically, i t ' s an aluminum-complex grease, and this type of grease has excellent performance when there's a chance of water contamination, like on your trailer.

A primer about grease: It's basically nothing more than a heavy oil mixed with enough soap to make it stringy and clingy enough to remain in place as the bearing spins. This will ensure the bearing's rollers or balls are constantly covered in the oil. The soap is based on a variety of compounds, notably lithium or aluminum complexes for most of the greases used in cars, trucks and boats.

Problem: Not all the soaps are compatible with each other. This causes the soap and the oil to separate, letting the latter settle to the bottom of the cavity the bearing is in. No surprise—a lot of grease caps have a poor metal-to-metal seal and will let the oil leak out after some weeks. Like yours did.

Your wheel bearings were probably originally lubed with a lithium-12-complex grease, a perfectly good grease for wheel-bearing use, even on a boat trailer if it’s maintained. Shooting some more grease into the bearing cap with a grease gun isn’t a bad idea. Shooting an incompatible grease in is.

This counterpoints the need to completely remove the last vestiges of old grease from a bearing whenever it's repacked. Yes, you want to remove the dirt and wear particles, but odds are you won't know what kind of grease the last mechanic used.

I'm not going to print a huge grease compatibility chart here, although that kind of information is available on the Internet. If you always clean the bearings properly before repacking, it will never be a problem.

Don't have a nice parts-washing sink with recirculating solvent handy to your driveway? It's still easy to clean the bearings properly. Remove the bearings, inner and outer, and any shims, lockwashers and clamp nuts. The bearing inner or outer races can stay pressed in place, however. Scrub the inside of the bearing cavity with paper towels until you've got as much grease out as possible, and wipe as much off the bearing itself. Dump the used paper towels. My favorite bearing cleaner for the field is a disposable aluminum pie tin, but any suitable vessel will do. One at a time, clean the parts in solvent, whether it's turpentine, paint thinner, kerosene or even hot, soapy water in a pinch. Keep the bearings separate so they go back into the same wheel-don't mix and match. Use a cheap disposable paintbrush to scrub all the old grease out. Let dry, then finish with a quick blast of carb or brake cleaner to get the last dust off. If you have compressed air, you can use it to dry the bearings as long as you don't spin them into destruction. Pack the bearings by hand, and fill the cavity approximately halfway with grease.

How To Repair A Cracked Vinyl Dashboard

Q: I have tried to take exceptionally good care of my 2006 Jetta’s interior and exterior, but this winter a 1/4-inch crack appeared in my dash. It almost looks like it has been cut, and I have no idea where it came from. My greatest concern is the crack getting larger. What are my options?

A: That dash consists of a vinyl fabric over a foam padding. Sunlight, excessive cleaning and incessant slathering with protectant can leach all the vinyl-chloride plasticizer out of the vinyl—which then gets brittle and cracks. Eastwood (eastwood.com) has a repair kit that will let you make a pretty good repair if the crack is small, especially if it’s in an unobtrusive place. Unfortunately, odds are the vinyl will crack elsewhere fairly soon. The only real cure is to recover or replace the entire dash, which is neither simple nor cheap.

Your other solution is one of those cheesy-looking fabric dash covers. You also could go retro and glue on some shag carpeting . . .

Next time, don’t use anything except a soft rag and warm water to clean the dash. Avoid harsh cleaners like 409, Janitor in a Drum, ammonia, alcohol, window cleaner or even detergents. They’ll leach the plasticizers out of the vinyl coating prematurely.

Mar 6, 2012

How to Prevent Chattering Windshield Wipers

Q: I think I saw an ad in a recent issue for some kind of radical new windshield wiper. The wipers appeared to be very different...they looked like a solid white plastic piece, with a black line down the middle. I'm in desperate need of windshield wipers that actually work on my Volvo S60.

A: I can’t help you with the ads since I don’t see them at all until the magazine is back from the printer.

Usually poor windshield wiper performance is fixed by new blades. Chattering can involve judicious tuning of the blades’ angle to the glass.

My suggestion is to try thoroughly cleaning the glass with some non-scratching cleaner like Bon-Ami or Bar Keepers Friend, and follow up with Rain-X.

Horsepower vs. Fuel Economy

Q: It seems like your magazine features at least one excessively over powered gas guzzling car every issue, which seems to be in keeping with our country's obsession for ever more horse-power. The Japanese seem to hit their stride in terms of efficiency and reliability in the 1980s, and ever since, with a few exceptions, they have been jumping on the horse power wagon too. I had the opportunity to borrow a friend's late 80s 4-door Civic and was pleased with the car's acceleration and amazed by the gas mileage, 44 miles per gallon on the highway over two tanks. The mileage of Civics built in the 90s and in this decade still doesn't come close, so why should we get excited about some new Fiat 500 that is reported to only get 40 mpg and is much smaller than a 30-year old Honda?

A: Don’t forget to factor in that cars new emit less than 100th of a percent less emissions than a ‘70’s vintage car and are far safer in a crash thanks to engineered structures that crush and as many as a dozen air bags. All of that adds weight and complexity, which affects mileage.

My Car Radio Stopped Working

Q: Recently I replaced the battery in my 2006 Mazda, but now my audio system doesn't work. What did I do wrong?

A: Interrupting the voltage to the battery has activated the radio’s anti-theft code. That way, if someone steals a radio, it’s useless.

Somewhere in the paperwork in the glovebox that the car came with should be a sheet of cardboard with the radio’s security code. If you can’t find it, you’ll have to go to the dealer and pay to have them reset it. If it gets to that, be sure they give you the code for next time.

Mar 4, 2012

30 Car Mysteries Solved: Spark Plug and Battery Testing

I turned the old pickup's key and knew instantly--it was dead. There was no juice left in the battery. Someone had rescued a garage-find dead battery, charged it and shoehorned it into the truck on the cheap. The bad battery fried the aging alternator, and it wound up in my shop for a charging-system transplant. Hours later, after a new battery and alternator had been installed and I'd chased a couple of parasitic drains, the engine still wouldn't start. I'd been tinkering around in the fuse box, so I figured I had jiggled some of the shaky wiring harness loose. In these situations, one of the first things to do is check for spark. Just pull a plug wire, clip on the spark tester, crank the motor and look for spark jumping the gap, right? There's an easier way: the OK Spark plug tester.

Just hold the tester's probe near a plug wire (or even near a coil-on-plug coil assembly) and you can tell if the plug is firing. It will even detect a fouled plug, something a conventional spark-gap type of tester won't do without removing the plugs. It's a huge time-saver. I just had to hold the probe near any of the plug wires while someone cranked the engine. I found my problem in the injection harness easily, knowing for certain I had spark. OK Spark means you don't have to pry stubborn plug connectors off, keeping you clear of the engine's red-hot exhaust manifolds.


Water Shortage

Q:

Three months ago, my seldom-used 1985 Chrysler New Yorker steamed up under the hood. When it cooled off, I discovered that all the coolant had gone. After refilling and checking it regularly, I found none was leaking on the ground. Yesterday the same result: no coolant. Where does it go? Presumably it disappears only when I am driving.

A:

That coolant is leaking, for sure. And it's leaking one of several possible ways. It could be going into a combustion chamber and leaving as steam through the exhaust ports. Or it's leaking into the oil. A small leak would leave the oil mostly water-free, as the PCV system will pull a lot of moisture out of the system if the vehicle is driven far enough to warm the oil to around 180 F and keep it there. One other possibility is that, once hot, it's leaking in small amounts either as steam or onto a hot spot (like the exhaust manifold), where it will evaporate without leaving a wet spot. Also, a tiny leak in the intake manifold gasket might get into the manifold itself, where a small amount of coolant could simply be sucked into the combustion chambers, turned into steam and--buh-bye. You hope that's the case, because the other possibilities would mean pulling the cylinder heads to replace the head gaskets, which would probably cost more than the car is worth.

There are ways to chase these leaks. The easiest is to pressurize the cooling system with compressed air and listen for the hissing at the exhaust pipe, the oil filler cap or the top of the carb or throttle body. Stant and others make an adapter to fit the radiator neck with a hand pump and a gauge. Just pump up the system and start chasing leaks. Trouble is, some leaks only leak when the engine is up to operating temperature, so don't burn yourself. If that doesn't work, you may need to add fluorescent dye to the system and use a UV light and yellow goggles, CSI Miami-style.

Troubling Transmission

Q:

I have a question about my 1997 Eclipse Spyder (it barely has 80,000 miles on it). Recently, when I get ready to leave my house, I push down the clutch to start it and it seems to require way less force than it used to. Then, when putting the transmission in reverse to back out of the driveway, it grinds a little. If you try a few times, it will eventually go into gear with no problem. After a few shifts, the gearbox starts to act normally. What's going on?

A:

Your Eclipse, unlike many vehicles that use a mechanical linkage or a cable, uses a hydraulic clutch actuator. Air in the hydraulic line is keeping the clutch from disengaging sufficiently. A few pumps will purge the air, but it seeps back into the master cylinder overnight. I'd start by flushing out the old fluid (actually, just DOT-3 or DOT-4 brake fluid) and bleeding the system thoroughly. If that doesn't fix it, you've got a leak that's sucking in air. Rebuilding or replacing the master and slave cylinders should cure it.

Fuelish Solution

Q:

I have old premixed boat gas; 8 gallons of it, mixed 50:1 with oil. It's too old to use in my two-cycle outboard. Can I put it in my 1997 Land Cruiser? I figured I would dump the mix in with the tank half full and top it off with fresh fuel afterward, or do it 4 gallons at a time for further dilution. Will it foul my fuel injectors with that bit of oil? Or should I just throw it away?

A:

Gummy, old, oxidized premix gasoline is a poor candidate for use in a modern, catalytic-converter-equipped car. Come to think of it, so is old, oxidized gas without the extra two-stroke oil, too. The oil can potentially contaminate an expensive cat, and any varnish (produced when gasoline oxidizes, in the same way that oil-based paint cures) might foul the fuel injector pintle valve(s), which are also not cheap to replace. No, the fuel filter won't catch the varnish. And if it did, you'd need to change the filter soon, and that usually involves removing the gas tank from the car, which will cost far more than your out-of-date fuel.

Plus, there's the problem of phase separation caused by water making any ethanol drop out of the solution. Odds are any fuel stored in a container that's not perfectly sealed will soak up atmospheric moisture. This will leave you with a layer of water and ethanol in the bottom of the tank and a layer of cloudy gasoline floating above it--and neither layer will burn well enough to run your, or any other, engine.

Adding more alcohol (gas line drier, like Heet or Dri-Gas), the traditional solution for water in the gas, won't work. There's nothing you can add to remove the oil or water.

My advice? Call the local DPW or fire department and find out a safe, legal way to dispose of the fuel.

Self-Taught

I recently did some work on my old 1996 GMC pickup that had started to run erratically. It seemed to be dropping a cylinder and losing power. I checked for fuel and spark ... I pulled the plugs, etc. I suspected a cylinder was not firing, but the plugs all worked fine.

Then, I went to looking for a bad injector, without a scan tool. Well, using one of my R-12 Freon gauges, I hooked up to the fuel-pressure rail (Schrader-valve type). Then I turned on the key and watched the pressure go up and remain steady. After gaining access to the multiconnector for the fuel injectors on top of the intake plenum, I one by one ran a hot lead jumper to each of the eight connectors. Each time I did that, the pressure gauge would drop as I opened the injector--except for one particular cylinder. Was that one cylinder the culprit and the reason for the dropped power and low-speed miss?

After further investigation, I found that replacing all the injectors was better than replacing just the faulty one. Either of these two individual components could have been defective, and the cause of my problem. With most of the labor involved in accessing the fuel injectors, I felt it was more prudent to replace them all with new (and better designed) units rather than only one cylinder's worth. The new ones differ from the originals, in that the injector and poppet valve are made from metal and are an integral unit. The original GM design consisted of plastic components, with a solenoid section and poppet valve that are separate from each other. Eight new ones obviously cost more. However, with the 350,000-plus miles on the original injectors, others were sure to fail in the near future. After it was all said and done, I had a neighbor who has a scan tool hook it up to read the codes and zero them out, just to make certain nothing else was happening that I didn't know about.

Couldn't have said it, or done it, better myself. The flat-rate book says that replacing a single injector takes 2.6 hours, and only another 18 minutes to replace them all, so it makes sense to do all eight at that kind of mileage. The only thing I might add is that if you fixed the bad injector, the Check Engine light would have gone off on its own after a couple of engine start-stop cycles. Or you could have pulled the engine-control-module fuse for a few seconds, or even just lifted the battery negative post to clear the code. 

30 Car Mysteries Solved: Trailer Turn Signals

Q:

I just picked up a nice used camper trailer. The turn signals all light up, but they flash about three times per second instead of once every 2 seconds. The gentleman who sold me the trailer claims it worked just fine with his truck. My mechanic can't find anything wrong with my car--but I can't even tow the trailer over to him until I get the lights working.

A:

You need to upgrade your flasher relay to a heavy-duty flasher. Here's how those old-fashioned flashers work. There is a set of switch points attached to a bimetal strip, all in series with the turn-signal bulbs and the battery. When the turn signals are switched on, current flowing through the bimetal strip heats it up, and the strip starts to curl, breaking the circuit. A second or so later, the strip cools off, making the connection again, a sequence that repeats until the signals are canceled. Plug in the trailer, and you're adding two more filaments to draw more current, which makes the bimetal strip heat up faster, accelerating the blink rate. Go down to the auto parts store and get a flasher rated for towing. It costs around five bucks and plugs right in under the dash. Can't find it? Turn on the signals and follow the click. The heavy-duty flasher either uses a circuit that isolates the bimetal strip from the load, or just does the whole thing electronically.

I sometimes get letters from readers who can't hear the flasher relay at all, regardless of how fast it's blinking. A lifetime of rock-and-roll, high-caliber handguns, motorcycles and race cars is starting to affect my hearing, too.

Fortunately, you have an option. They make special, louder flasher relays that are also dirt cheap. Just substitute one for the old flasher.

Here's the bad news. Many modern vehicles have integrated the flasher-relay function into a fancy-dan lighting-control module, or whatever they call it, and you're stuck with what's built into it. Most of these vehicles will handle a trailer, but the volume of the flasher is fixed. I bet a decent mechanic or one of those shops that installs car stereos could splice in a chime or a buzzer or something, probably for a lot more than the cost of a new relay.

Best (or at least cheapest) solution I've seen was a fellow who epoxied the lid from a tuna can to the standard flasher relay, making a sounding board to increase the volume substantially.

Altitude Correction

Q:

My home and shop are at an elevation of 8000 feet. How does this change my readings when doing a compression test on my car?

A:

Compression readings are done by removing all the spark plugs, attaching a compression gauge to an individual cylinder and cranking the engine to measure the maximum pressure built up in the cylinders.

Expect the readings to be lower at altitude than at sea level. Normally, I'd expect to see readings somewhere between 120 and 160 psi at sea level, but the number will vary, determined by your car's compression ratio and camshaft timing. Depending on the altitude, the barometer reading on any given day and how robust your battery is, the actual readings you get on a compression test can vary 10 to 15 percent up or down. What's far more important is the consistency between the cylinders. If they're all a few pounds low, it might be that your battery is just a little discharged, or the barometer is low, or the throttle valve isn't propped open far enough while cranking the engine. If only one is weak, the condition might be indicative of a burned valve, leaky ring or scored cylinder wall. If two adjacent cylinders are very low, I immediately suspect a blown head gasket between them.

Counterintuitively, high-performance engines often show lower compression readings because the hot camshafts leave the valves open well past bottom dead center, lowering the effective compression ratio.

A number of late-model cars can replicate a compression test without removing the spark plugs. Under the command of a technician armed with a scan tool, the computer disables the cylinders one at a time in some sort of random sequence. After a few minutes, it will return a "Cylinder Balance" result. The cylinder(s) with low compression will affect idle speed less than the others when switched off, pinpointing any problems. I still like to do a compression test or leak-down test, because it gives me a chance to look at the plugs.

Locked Out

Q:

I own a 1969 Ford with a 428 Cobra Jet engine and the car constantly stalls. It has a mechanical fuel pump and "hard" fuel lines from the pump to the carb. I checked the fuel pump pressure and it reads 7 pounds. The car drives anywhere from 1 mile to 20 miles before it stalls. My next fix is to replace the fuel pump, but I am wondering if the car is suffering from vapor lock. It is a big block with long tube headers, so it certainly gets hot under the hood. The fuel line does not touch the block or manifold at any point. The car had a rubber fuel line from the pump to the carb when I purchased it, but it was not installed any farther away from the block or manifold than the hard line. If it is vapor lock, would changing back to a rubber fuel line solve the problem?

A:

I agree, it's probably vapor lock, caused by liquid fuel boiling in the carb or fuel lines, preventing sufficient liquid fuel from reaching the jets. The vapor pressure of gasoline is much higher than it was in 1969, since we use a lot more of the crude oil in the barrel, including a higher percentage of more volatile fractions that used to be flared off. And it's those fractions that boil at lower temperatures than the rest of the fuel. Fortunately, fuel-injected cars aren't prone to vapor lock because the fuel in the engine compartment is usually between 30 and 60 psi, not the seven or less used by carbureted vehicles.

Changing back to a rubber line and moving it away from the headers might help reduce the temperature of the fuel inside the lines. Just insulating the hard line might be enough to prevent boiling. The fuel is probably actually boiling in the float bowl, however, not in the line. They make insulated base gaskets for those carbs, and some cars with carbs used sheet-metal heat shields to keep heat from the headers from radiating into the carburetor.

Toward the end of the carburetor era in the '80s, some manufacturers resorted to recycling some of the fuel from the fuel pump back to the tank. This was done with a tee fitting that had a small restriction in one leg of the tee, allowing a small trickle of fuel to go back to the tank through a separate line. The cool fuel from the tank, moving continuously through the line, kept the fuel from boiling. This required a fuel tank with an additional fitting for the return line. You might check if your tank could be modified, or replaced with a later model tank with the fitting. Come to think of it, the fitting was often in the fuel sender plate, so all you might have to change is the fuel sender for one with the extra fitting, and then run an additional line from the engine compartment back to the tank.

If you have air conditioning, you might try my favorite fix: Wrap the fuel line around the cold a/c refrigerant line as the refrigerant line heads back to the compressor from the evaporator. Strip off the insulation, wrap the hose around the cool line, and rewrap with fresh insulation. I'll bet that if the engine is hot enough to vapor lock, you're hot enough to need the air conditioning on.

Mar 1, 2012

Low-Profile Tires

If you're buying a new car for comfort, order smaller wheels fitted with larger-sidewall tires—they'll offer a softer ride. Less aggressive shocks may help a bit but at the cost of handling. Beyond this, you're looking at changes to suspension hardware, which isn't for the faint of heart. You'll have a tough time finding parts anyway, as the aftermarket usually aims to make cars more rigid rather than pillow soft.

When we say low-profile, we're talking about the size of the edge of the tire. Read the numbers molded into the sidewall; the second number printed in the series is the aspect ratio, indicating sidewall thickness as a percentage of tread width. For example, a P225/45R15 tire has a 15-inch wheel size with 225 mm of tread width, and the sidewall is 45 percent of tread width, or 101 mm. The higher the aspect ratio, the thicker the sidewall and the comfier the ride; lower aspect ratios lead to thinner sidewalls and a stiffer ride. There are drawbacks to this kind of rubber. Tires are a part of your car's suspension—the sidewalls absorb some of the most vicious road imperfections. Unless the suspension has been designed to accommodate the stiffer sidewalls, it can mean a rougher ride. Blowouts (a hole in the tire caused by road debris) shouldn't be more frequent than with normal tires since the tread and ply construction aren't much different. Rapid deflation is something to be concerned about; hitting a pothole with thin sidewalls can damage the wheel. Tiremakers constantly improve designs with more robust materials and construction, so newer tires aren't damaged as often as old low-profile tires.

Low-profile tires do seem to be popping up on a lot more cars these days, but they're being offered for several reasons. Bigger wheels and skinnier sidewalls in a normal-size wheel well mean manufacturers can make room inside the wheel for larger brakes. Thin sidewalls are also stiffer and deliver better cornering and road feel. Let's not avoid the obvious though—low-profile tires just look cooler than regular tires.